

Advertisement
Apple’s Mac is one of the best and most used operating systems in the world; its dominance hardly surprises anyone because of its success with its first product, the iPhone. If you are using a Mac and want to know how to record your screen while doing video calls or when playing games, you are in the right place, here, you will learn how to record your Mac screen without using third-party software.
Table of Contents
How to use QuickTime Player to record your Mac screen
Your Mac comes with a built-in screen recorder called QuickTime Player that you can use to record your screen, audio, or both. To use the built-in screen recorder, follow these steps:
QuickTime Player
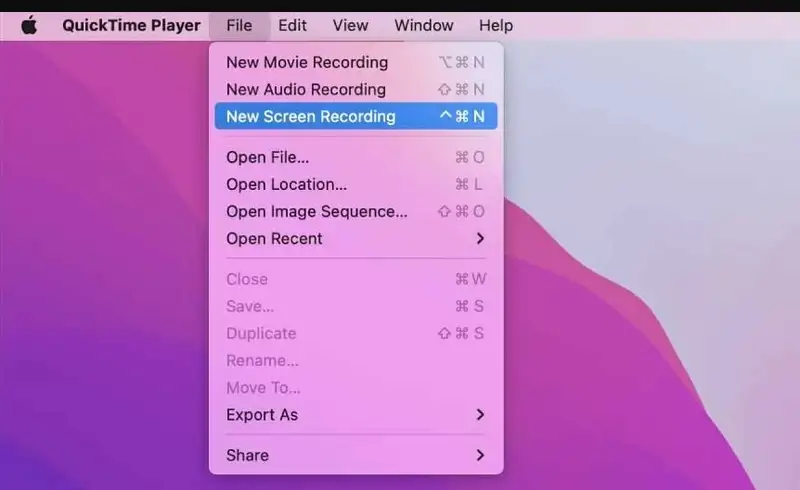
- Open QuickTime Player.
- Click File > New Screen Recording.
- In the Screen Recording window, choose what you want to record.
- To record your entire screen, click the Record Entire Screen button.
- To record a specific portion of your screen, click the Record Selected Portion button and drag the pointer to select the area you want to record.
- If you want to record audio, click the Microphone button and select the microphone you want to use.
- Click the Record button to start recording.
- When you’re finished recording, click the Stop button.
Your recording will be saved in the Movies folder in your Home folder.
Here are some additional tips for using the built-in screen recorder:
- You can use the keyboard shortcuts Command-Shift-5 or Command-Shift-3 to open the Screen Recording window.
- You can use the Options button in the Screen Recording window to change the recording settings, such as the quality and frame rate.
- You can use the Edit button in the Screen Recording window to trim or edit your recording.
What is a screen recorder?
A screen recorder is a software application that allows you to record your computer screen. This can be useful for a variety of purposes, such as creating tutorials, recording gameplay, or capturing video calls.
If you want more features and customization options, you can use a third-party screen recorder. There are many different third-party screen recorders available, both free and paid. Some of the most popular third-party screen recorders include:
- OBS Studio
- ScreenFlow
- Camtasia
- ApowerREC
- Jing
- Screencast-O-Matic
To use a third-party screen recorder, follow the instructions that come with the software. Most third-party screen recorders have similar features and options.
How to use OBS Studio to record your Mac screen
OBS Studio is a free and open-source screen recorder that is available for Windows, Mac, and Linux. To use OBS Studio to record your Mac screen, follow these steps:
- Download and install OBS Studio.
- Open OBS Studio.
- In the OBS Studio window, click the + button and select “Screen Capture”.
- In the Screen Capture window, choose what you want to record.
- To record your entire screen, click the “Entire Screen” radio button.
- To record a specific portion of your screen, click the “Window” radio button and select the window you want to record.
- If you want to record audio, click the “Audio” checkbox and select the audio source you want to use.
- Click the “Start Recording” button to start recording.
- When you’re finished recording, click the “Stop Recording” button.
Your recording will be saved in the Recordings folder in your Documents folder.
How to use ScreenFlow to record your Mac screen
ScreenFlow is a paid screen recorder that is available for Mac. To use ScreenFlow to record your Mac screen, follow these steps:
- Download and install ScreenFlow.
- Open ScreenFlow.
- In the ScreenFlow window, click the Record button.
- In the Record window, choose what you want to record.
- To record your entire screen, click the “Entire Screen” radio button.
- To record a specific portion of your screen, click the “Selected Area” radio button and drag the pointer to select the area you want to record.
- If you want to record audio, click the “Audio” checkbox and select the audio source you want to use.
- Click the “Record” button to start recording.
- When you’re finished recording, click the “Stop” button.
Article content continues below;
More Articles
- Dstv Now: How to watch Dstv for free on Android
- Best Power Bank for iPhones
- Top 10 Of The Best Universities in Nigeria 2025 – A Detailed Analysis
- MTN Free Browsing Cheat Codes
- Top 3 of the best password managers for Smartphones and Desktop
- Cristiano Ronaldo in tears in a recent interview
- DJ Cuppy has Accidentally gone nude in a new viral clip
- All Cristiano Ronaldo Records and Achievements
- Davido’s net worth and awards 2025
- Wizkid’s net worth and awards 2025
- More celebrity profiles
Tips for recording your Mac screen
Here are some tips for recording your Mac screen:
- Plan your recording. What do you want to record? How long do you want to record?
- Use a high-quality microphone. To record audio, use a high-quality microphone for optimal sound quality.
- Test your recording settings. Before you start recording, test your recording settings to ensure you are achieving the desired quality.
- Edit your recording. Once you have finished recording, you can edit your recording to trim it, add titles, and more.
Recording your Mac screen can be a great way to create tutorials, record gameplay, or capture video calls. There are many different ways to record your Mac screen, both with and without third-party software. Choose the method that works best for you and start recording!
We are committed to helping you with your research and making sure you are updated with the latest information, so leave us your email below to be the first to know when shit happens.
Subscribe to the latest information on Son Media!
Advertisement
Very educative!